
Ponder Basics
Unless explicitly stated otherwise, all files mentioned in this chapter should be created under client_scripts.
Example code location: (for reference).
Getting Started
Because Ponder scripts are client-side, besides vanilla F3+T reload you can also reload them with kubejs reload client_script.
js
Ponder.registry(event => {});Creating Scenes
The script below creates a scene:
js
Ponder.registry(event => {
  event
    .create("kubejs:submarine_core") // Item/Tag to attach Ponder to. Use [ ] when providing multiple.
    .scene(
      "kubejs:submarine", // Ponder ID
      "Submarine", // Title shown on the side
      (scene, utils) => {
        // The body of the scene lives inside { }.
      }
    );
});
One item can have multiple Ponder scenes. In-game you can flip pages in the Ponder UI to see them.
There are several ways to create multiple scenes.
js
// 1. Chain another .scene() after the first one
Ponder.registry(event => {
  event
    .create("kubejs:submarine_core")
    .scene("kubejs:submarine_1", "Submarine", (scene, utils) => {
      // Scene 1
    })
    .scene("kubejs:submarine_2", "Submarine", (scene, utils) => {
      // Scene 2
    });

  // 2. Create another one separately (it can even be in another script file)
  event
    .create("kubejs:submarine_core")
    .scene("kubejs:submarine_3", "Submarine", (scene, utils) => {
      // Scene 3
    });
});- Notes:
Scenes are ordered by load order (1..n). Use page flipping to switch between them.
Reusing the same Ponder ID across different scenes usually will not crash, but can cause issues like wrong titles or wrong text.
Configuring The Base Structure
First, you need a structure (for example, a floor). You have two ways to set up the base structure.
- Use Create's built-in base plate helper
js
// When used inside the scene body { }, this generates an n*n plate, offset by x to the west and z to the north.
// Parameters: X offset, Z offset, and the plate size. (x < 0 means east, and the same logic applies for z)
// P.S. The built-in plate is at most 5x5. If n > 5, the region may appear larger but only 5x5 blocks are actually set.
scene.configureBasePlate(x, z, n);- Prepare your own base structure
First, you need an .nbt file.
You can get an NBT structure using Create's or vanilla . (Learn how to use them separately; this tutorial does not cover them.)
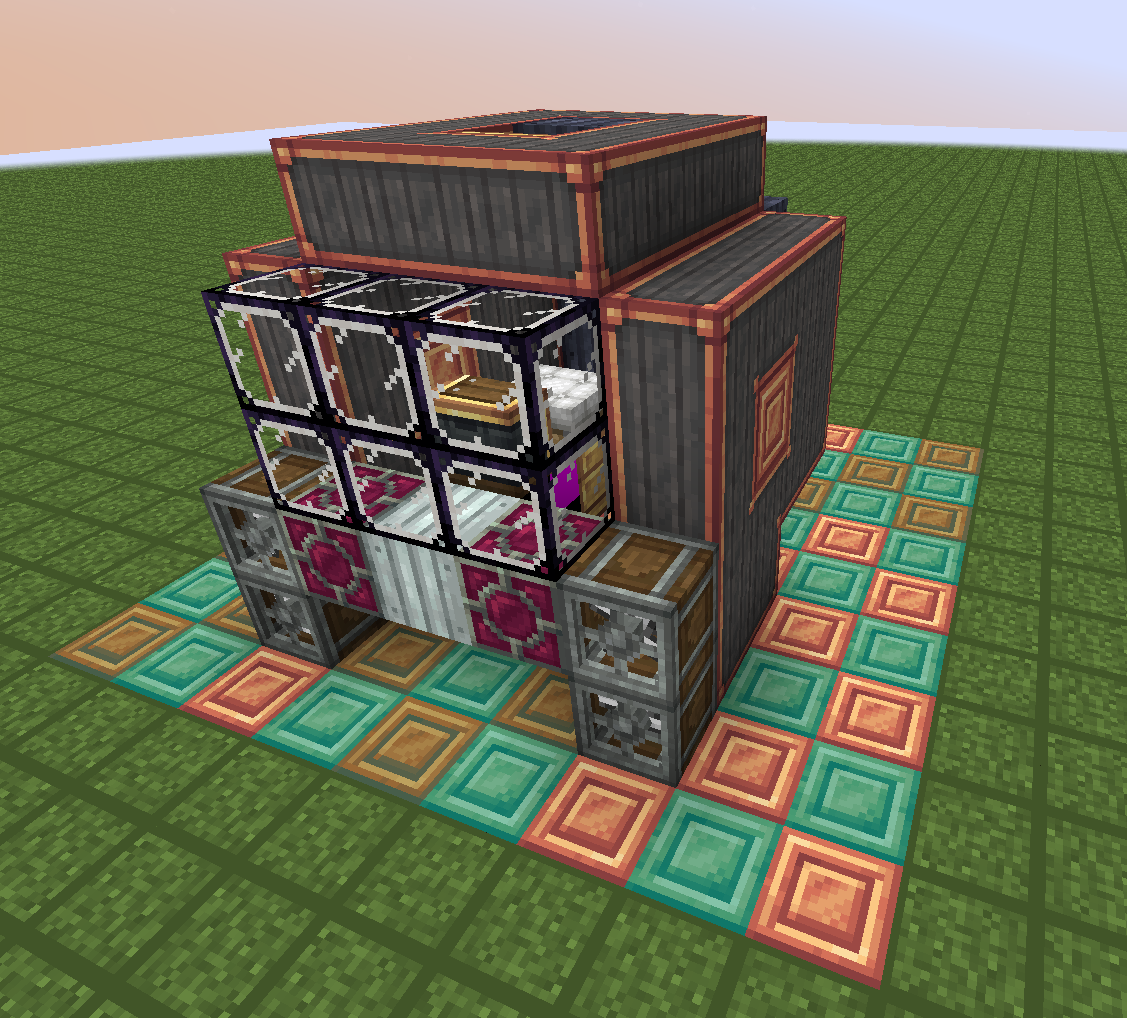
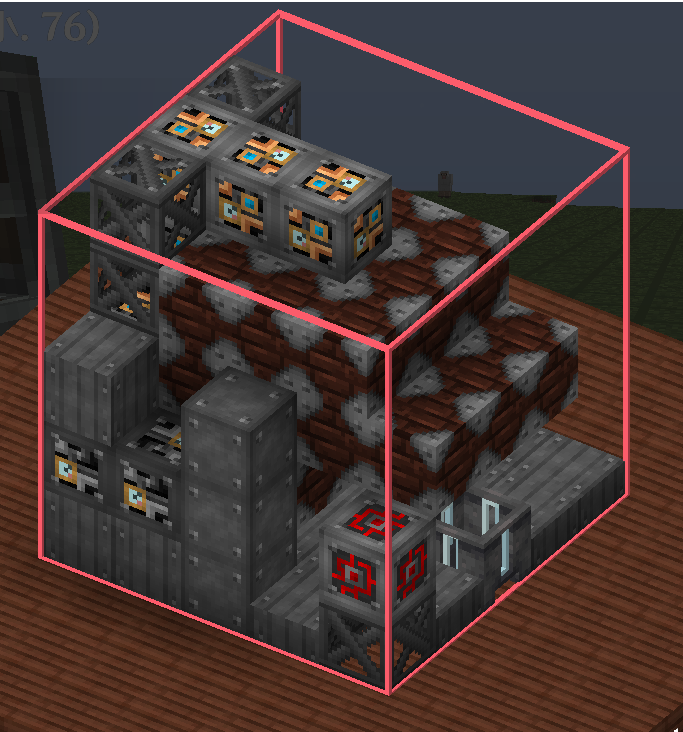
Important: if the structure you export is "just a floor", and you want to build many Ponder scenes on top of it, you must also include enough air blocks above the floor in the exported structure. If you do not include enough air, normal blocks may not render correctly in the scene.
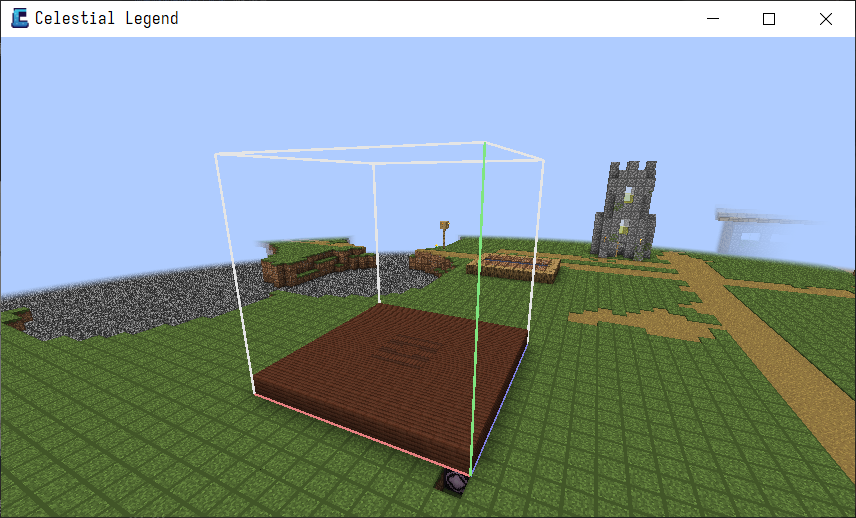
Recommended: export a cubic structure like the image above, including the air blocks. (In practice, exporting an "empty air volume" like this usually cannot be done with Blueprint and Quill; you generally need the vanilla Structure Block.)
When exporting a complete NBT structure, it's best to include the floor in the same export.
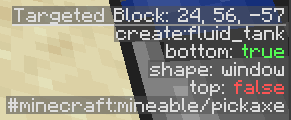
You can enable Ponder's developer mode to show coordinates (per world; you need to enable it again in a new world).
After enabling it you can see block coordinates.
Store the NBT file under
When creating the scene, pass the structure name to load your prepared base structure.
js
Ponder.registry(event => {
  event.create("kubejs:submarine_core").scene(
    "kubejs:submarine",
    "Submarine",
    "kubejs:submarine", // Structure file name under kubejs/assets/kubejs/ponder/
    (scene, utils) => {}
  );
});
Showing The Base Structure
At the beginning you typically want to show part of the structure (for example, the floor). Inside
{}you can use:
js
// Show only the part at y = 0 from the loaded NBT structure
scene.showBasePlate();
// Show y = 0..n. If you omit the argument, the whole structure will be shown.
scene.showStructure(n);
P.S.: even if you used the built-in generated base plate, you still need to show it manually.
showBasePlate()andshowStructure(0)are equivalent.
Adding Delays
If starting animation immediately after showing the base feels too fast, you can add a delay:
js
// Wait 20 ticks
scene.idle(20);
// Wait 1 second
scene.idleSeconds(1);
Tip: once your Ponder script is "done", make sure there is at least a 1-second pause somewhere, otherwise it can feel too fast to read.
20 ticks = 1 second. For more details about ticks, see 👉👈.
At this point your code should look like:
js
Ponder.registry(event => {
  event
    .create("kubejs:submarine_core")
    .scene("kubejs:submarine", "Submarine", "kubejs:submarine", (scene, utils) => {
      // Show the base plate, then wait 20 ticks
      scene.showBasePlate();
      scene.idle(20);
    });
});
Keyframes
In long Ponder animations, you often want to jump to key moments. Ponder does not have a video-like scrub bar, but it does support a similar concept: keyframes you can jump between.
js
// Create a keyframe at the current tick
scene.addKeyframe();

// Create a "lazy" keyframe 5 ticks later
scene.addLazyKeyframe();
Observed behavior:
js
// Two consecutive addKeyframe calls only create a single keyframe
scene.addKeyframe();
scene.addKeyframe();

// This creates two keyframes, 5 ticks apart
scene.addKeyframe();
scene.addLazyKeyframe();
Placing Blocks
Next, let's show a fan. Using the floor coordinates in the Ponder scene, you can estimate where each block should go.
- Note: the closest floor block has coordinate
[0, 0, 0]. Movingleft,up,rightcorresponds tox, y, zrespectively.
From the structure above, the fan on the right is at
[2, 1, 1], so we write:
js
// Place a fan at [2, 1, 1]. If there's a block already, it will be replaced.
scene.world.setBlocks([2, 1, 1], "create:encased_fan");

// Same as above. If the third argument is false, no breaking particles are shown.
scene.world.setBlocks([2, 1, 1], "create:encased_fan", true);
Note: the last two parameters appear to be swappable, i.e.
scene.world.setBlocks([2, 1, 1], "create:encased_fan", false); = scene.world.setBlocks([2, 1, 1], false, "create:encased_fan");
Showing Blocks
Placing blocks is not enough; you also need to make them visible in the scene.
js
// Show the block at [2, 1, 1] with a falling animation from above
scene.world.showSection([2, 1, 1], Direction.down);
To show a whole region, you can write:
js
scene.world.showSection([3, 1, 1, 1, 1, 3], Direction.down);This shows every block in the rectangular cuboid defined by corners [3, 1, 1] and [1, 1, 3] using the falling animation.
Similarly, setBlocks can also take regions to place blocks quickly.
If a position is already in a "shown" state, blocks placed into that position will appear immediately and do not need to be shown again.
For example: after calling showStructure(n), all positions in y = 0..n become "shown", even if they were air.
Notes
[3, 1, 1, 1, 1, 3]can also be written as[1, 1, 1, 3, 1, 3].- In either form, the
showSectionanimation lasts 15 ticks.showSectionmerges the shown region intobaseWorldSection, i.e.scene.ponderjs$getPonderScene().baseWorldSection.
Modifying Block State
Often you need to specify a block's facing or variant (for example top/bottom slabs). Use the following to modify block state:
scene.world.modifyBlock(blockPos, state => state.with("stateName", "stateValue"), showParticles);
Example:
js
// Change the block at [1, 1, 1] to face down, without breaking particles
scene.world.modifyBlock([1, 1, 1], state => state.with("facing", "down"), false);

// Set the block at [2, 2, 2] "Eye" to true (place an Eye of Ender into an End Portal Frame), with breaking particles
scene.world.modifyBlock([2, 2, 2], state => state.with("Eye", "true"), true);
Modifying Block NBT
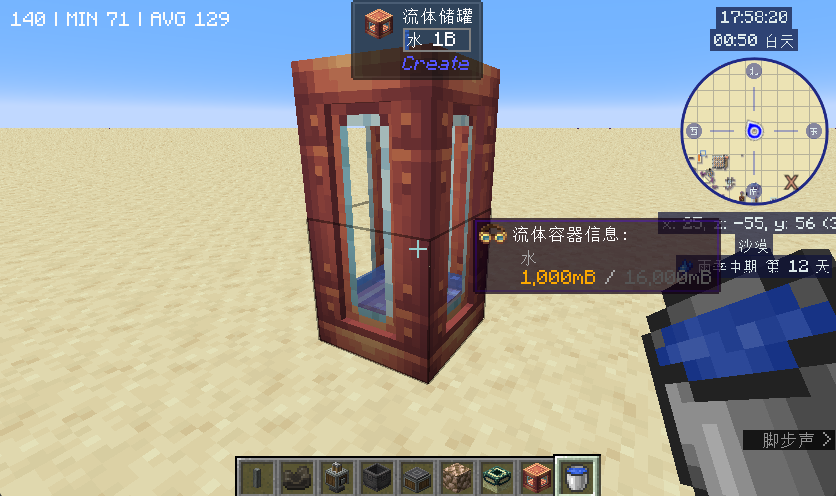
 As shown, the tank contains 1000 mB water, but the block state does not store that information.
Use F3+I (copy targeted block data) to check:
/setblock 24 56 -57 create:fluid_tank[bottom=true,shape=window,top=false]{Boiler:{ActiveHeat:0,Engines:0,PassiveHeat:0b,Supply:0.0f,Update:1b,Whistles:0},Height:2,LastKnownPos:{X:24,Y:56,Z:-57},Luminosity:0,Owner:[(owner UUID)],Size:1,TankContent:{Amount:1000,FluidName:"minecraft:water"},Window:1b}
You can see the fluid info (TankContent) is not in block state (the [...] part), but in NBT data (the {...} part).
So how do we modify it?
js
modifyTileNBT(selection, nbt => { /* NBT edits */ }, redrawBlockOptional)Example:
js
scene.world.modifyTileNBT([2, 3, 3], (nbt) => {
    nbt.Patterns = [
        {
            Color: 0,
            Pattern: "pig"
        }
    ]
})

scene.world.modifyTileNBT([3, 3, 2], (nbt) => {
    nbt.Patterns = [        {
            Color: 0,
            Pattern: "cre"
        }
    ]
})
Editing block NBT involves block entities and SNBT.
The advanced tutorial will cover this in more detail.
Text
Text is straightforward, so this section is short.
There are two display styles. The first is a text box anchored to a coordinate:
js
// Show "Text" for 40 ticks, anchored at [4.5, 3.5, 2]
scene.text(40, "Text", [4.5, 3.5, 2]);
The second is a text box shown at the top-right:
js
// Show "Text" for 30 ticks
scene.text(30, "Text");
Combined with keyframes, you can attach a keyframe directly to the text:
js
scene.text(30, "Text").attachKeyFrame();In Minecraft, you can prefix text with formatting codes to change its style (bold, colors, etc.). See 👉👈.
Outlines
This is also simple, so it is short.
js
/*
 * "red" is the outline color (Ponder supports only a limited set of colors).
 * Coordinates can be a region, like the one shown in the image.
 */
scene.overlay.showOutline("red", {}, [7, 1, 3, 3, 5, 7], 30);
Interaction Prompts
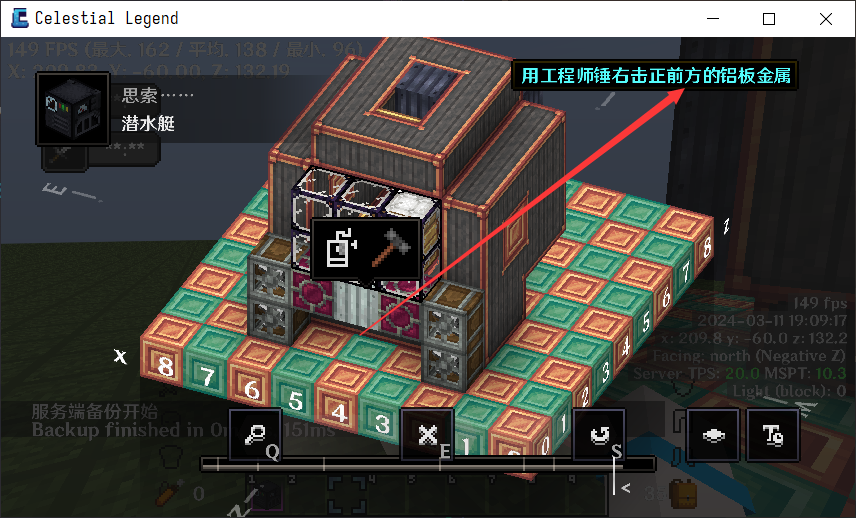
This is a typical example showing a right-click prompt:
Interaction prompts do not perform the action for you. They only show a small UI hint that tells the viewer whether the interaction is left click, right click, or something else. To make the scene feel complete, you usually combine the prompt with other effects (for example: replace a block at the same time). Here is a GIF example:
This uses two ideas together: right click and replacing blocks. Let's look at the right click prompt code first:
js
scene.showControls(30, [3, 1, 5], "left") // Create a box pointing left on the right side of [3, 1, 5] for 30 ticks
  .rightClick() // Show the right mouse button icon
  .withItem("immersiveengineering:hammer"); // Show the item icon for "immersiveengineering:hammer"
That's it. It's very readable when you break it down line-by-line.
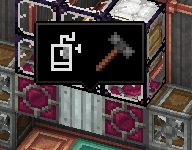
Combined with block replacement, the whole snippet looks like this:
js
// Create a box pointing down above [2, 1, 2] for 80 ticks, showing a right-click icon and "kubejs:sturdy_sheet_block"
scene.showControls(80, [2, 1, 2], "down")
  .rightClick()
  .withItem("kubejs:sturdy_sheet_block");

// Replace the block
scene.world.setBlocks([2, 1, 2], "mekanism:cardboard_box");
Other methods you can chain after
showControls:
js
scene.showControls(80, [2, 1, 2], "down")
 .clone(); // Function currently unclear
 .scroll(); // Show the middle mouse button (scroll wheel) icon
 .whileCTRL(); // Show the CTRL icon
 .withWrench(); // Show the Create wrench icon
 .showing(picon); // Show the icon for the given picon; see kubejs/constant/PonderIcons.md for all picons
 .leftClick(); // Show the left mouse button icon
 .whileSneaking(); // Show the sneak icon
.